Friday, November 22, 2013

Adobo chicken


I just realized how long it has been since I last posted a recipe on my blog...lazy lazy me! 
This one has been sitting among the drafts for a long long time and I figured it's time for me to share it with you.
Adobo chicken is a traditional meal from the Philippines whose name comes from the spanish word for marinade, although the preparation itself is not derived from spanish cuisine. As for any traditional dish there will most likely be a ton of different versions; the one I present here is a family recipe of a friend who cooked it for us - and it was love at first bite!
The pictures are not very appetizing, I know, but you'll have to trust me on this one: try it and you won't regret it!

1 cup vinegar
1/2 cup soja sauce
2 cloves garlic
2 cm ginger root cut in 2 slices
bayleaves
black pepper in grains
1-2 spoons tomato sauce

4 chicken thighs

2 cups of basmati rice

optional: 1/4 cup coconut milk (I prefer not to put it)


Put all the ingredients in a large pot, and let the chicken marinate for at least two to three hours, then bring it to boil, cover and let it simmer until the chicken is tender and the sauce is thickened. The sauce will stay liquid but you want the vinegar to evaporate a bit, and the chicken to be soft - I like to cook it at the point that it separates from the bones by itself. In the meanwhile cook the rice, as explained here.
Well, that's it! It couldn't be easier! :D
Serve the chicken with the rice and the marinade...enjoy!

One note: do no add any salt to the marinade, nor the rice. The soja sauce already contains more than enough!


POLLO ADOBO


Mi sono appena resa conto di quanto tempo è passato dall'ultima volta che ho pubblicato una ricetta sul mio blog...pigrona!
Quella che vi presento oggi, poi, giaceva da tempo lì, tra le bozze, e quindi ho deciso che era giunta l'ora di condividerla con voi!
 L'adobo di pollo (o pollo adobo che dir si voglia) è un piatto tipico della cucina delle Filippine, che prende il suo nome dalla parola spagnola che sta per marinatura (adobo, per l'appunto), anche se la preparazione è propria della tradizione filippina. Come per ogni piatto tipico immagino che ce ne siano infinite varianti; quella che vi mostro è la ricetta di famiglia di un amico che l'ha cucinata per noi - ed è stato amore al primo morso!
So che le foto non sono proprio appetitose, ma vi dovrete fidare di me: fatelo e non ve ne pentirete! 

250 ml di aceto
125 ml di salsa di soja
2 spicchi d'aglio leggermente schiacciati
2 cm di radice di zenzero tagliata in due fettine
alloro
pepe nero in grani
1-2 cucchiai di passata di pomodoro
opzionale: 63 ml di latte di cocco (io lo preferisco senza)

4 cosce di pollo con sovracoscia

2 tazze di riso basmati


Versate tutti gli ingredienti tranne il riso in una pentola abbastanza capiente e lasciate il pollo a marinare per due o tre ore. Spostate poi sul fornello e portate a bollore, quindi abbassate il fuoco e lasciate cuocere finchè la salsa non si addenserà leggermente - la preparazione rimarrà piuttosto liquida, ma vorrete che l'aceto evapori un po' - e il pollo sarà tenero (a me piace che il pollo sia molto cotto, al punto di sfaldarsi e staccarsi da solo dalle ossa).
Nel frattempo preparate il riso seguendo queste istruzioni.
E poi....basta! Non potrebbe essere più semplice!
Servite il pollo con il riso e la sua salsa, e buon appetito!

Una piccola nota: non aggiungete sale alla preparazione, la salsa di soia ne contiene a sufficienza!


Tuesday, October 15, 2013

Graveyard chocolate pound cakes


Hi guys! Here I am with another easy idea for some halloween treats! :)
Browsing the web for inspiration, I found some graveyard brownies, and since I just bought these tiny cute mini loaf silicon moulds, I decided to convert this muffin recipe into a chocolatey one. It turned out very nice, the coconut flour gave the pound cakes this rough look, as if the surface was made of earth, and well, there is chocolate and coconut milk...need to say anything else? :)
Here's what you'll need

65 gr flour
25 gr cocoa powder
40 gr coconut flour
 80 gr muscovado sugar
130 gr coconut milk
40 gr peanut oil
5 gr baking powder
pinch of salt

Dark chocolate
White chocolate

In a medium bowl mix flour, baking power, cocoa powder, coconut flour, sugar and salt. In a separate bowl combine coconut milk and oil. Add the dry mixture and stir quickly until just combined.
Scoop the dough in mini loaf cake moulds and bake at 180° for 20 mins.

For the decorations I melted the chocolate in a water bath, added just a few drops of oil (as Araba Felice taught us) and with a sac à poche and a decorating pen I literally "drew" the tombstones, bones, hands on a parchment paper sheet and let them dry. You can draw the subject you want on normal paper and put it under the parchment sheet to make things easier. ;)
I used more melted chocolate to stick them together, and decorated the pound cakes :)
It's nice, isn't it? ^_^


CIMITERO DI TORTINE AL CIOCCOLATO


Ciao! Eccomi qui con un'altra idea (spero) carina per halloween! :)
Navigando per il web in cerca di ispirazione, ho trovato dei cimiteri di brownies; visto che ho comprato di recente degli stampini da plum cake in silicone, ho deciso di trasformare i brownies in mini tortine, convertendo questa ricetta in una cioccolatosa! :D
Il risultato è stato sorprendentemente gradevole: la farina di cocco ha conferito un aspetto "terriccioso" alla superficie di questi dolcetti, perfetta per lo scopo, e poi..ci sono cioccolato e latte di cocco..devo aggiungere altro? :)
Ecco la lista degli ingredienti:

65  gr farina
25 gr cacao in polvere
40 gr farina di cocco
80 gr zucchero muscovado
130 gr latte di cocco
40 gr olio di semi (per me di arachide)
5 gr lievito per dolci
un pizzico di sale


Per le decorazioni:

Cioccolato fondente
Cioccolato bianco


In una ciotola abbastanza capiente unite tutti gli ingredienti secchi: setacciate la farina col cacao e il lievito, aggiungete lo zucchero, il sale, e la farina di cocco. In un contenitore separato versate il latte di cocco e l'olio di semi. Unite gli ingredienti secchi e mescolate velocemente. Versate negli stampini e infornate a 180° per 20 minuti. 

Per le decorazioni ho sciolto il cioccolato a bagnomaria e aggiunto un goccino d'olio (come insegna l'Araba Felice). Con l'aiuto di una penna per decorazioni e di un sac-à-poche ho letteralmente disegnato le lapidi,le mani, le ossa su un foglio di carta da forno, e ho lasciato asciugare. Potete disegnare i vostri soggetti su della normale carta bianca e disporla sotto la carta da forno per facilitarvi le cose. Ho usato altro cioccolato fuso per attaccare le varie parti insieme, e ho decorato le tortine. :) 
Carino, no? ^_^


Sunday, October 13, 2013

A quick and easy halloween dinner


Hello everybody! :D I came back just recently from a trip to Dresden and I am ready to show you what I did for halloween last year. I thought about having a single post for each dish, and maybe one for the decorations, but then I decided to put everything together in a last-minute halloween dinner post! Last year was very hectic so we didn't have the time to arrange anything, but we still wanted to celebrate. So we left the office at 6, went to buy some food and we could have our little cute frightening night! I should say that I ingredients that many food blogger will find horrific, like frozen vegetables (a blasphemy), ready made puff pastry (OMG O_o), supermarket croissants (if you stop reading now I won't blame you) and all this terrible food that one shoudn't even think about - but that comes in handy when you don't have enough time to prepare your own stuff. Plus, you can easily replace my industrial ingredients with more natural, hand made ones. :)
Here is what I used:

Scary mummies:
1 bag and 1/2 puff pastry
8 sausages

 Puking pumpkin:
A medium/small-sized pumpkin
Spinach

Croissants monsters:
Butter croissants
Nutella

Sooo let's start from the star of the evening: ladies and gentlemen, the puking pumpkin!


My boyfriend emptied the pumpkin and I carved the disgusted face, it was the first time for me and it was such fun! ^_^  For the puke I chose spinach, but you can put anything you like! I really think it is a nice idea :)
Then we move on to the scary mummy sausages...simply get some puff pastry, cut it int stripes and wrap the stripes around the sausages. This way you can form both the body and the head of the mummies. Use tiny bits of pastry for the eyes, if you want, and cook them in the oven at 200°.


In my humble opinion there is no dinner without dessert, so we prepared these monster-croissants. I was not even sure whether to include them in this post, since they are really trivial, but then I thought it can be a nice idea, really quick, plus if you have kids it can be fun for them to come up with different expressions for the monsters. So basically I cut the croissants, but not all the way - the opening is supposed to form the mouth, and then filled them with Nutella. With the help of a toothpick I then drew the eyes, teeth, nose of the monster with Nutella as well. Not the apex of cake design, but again, the main message of the post is: you can still have a fun halloween night with very little time to arrange it.


The decorations were the  only things we didn't buy the same day, but they are really basic: a few black candles, some spiderwebs, and a few of those small, decorative pumpkins.


Oh, and I forgot! Witch hats! :D :D


UNA CENA DI HALLOWEEN FACILE E VELOCE

 
Ciao a tutti! :D Sono tornata di recente da un viaggio a Dresda, e sono pronta a mostrarvi cosa ho organizzato per la cena di halloween lo scorso anno. Ero incerta se dedicare un singolo post ad ognuna delle preparazioni, e forse uno per le decorazioni, ma poi ho deciso di unire tutto in un unico post in stile "cena di halloween dell'ultimo minuto". Ottobre dello scorso anno è stato davvero un mese infernale, perciò con il mio ragazzo non abbiamo avuto tempo per pianificare nulla, ma volevamo festeggiare lo stesso. Perciò, una volta usciti dall'ufficio (erano più o meno le 6 di sera), siamo corsi al supermercato e abbiamo comprato il necessario per la nostra piccola notte di terrore! Anticipo già da ora che troverete ingredienti che faranno accapponare la pelle a molti food blogger (e non), come verdure congelate (sacrilegio!), pasta sfoglia già pronta (ommioddio O_o), cornettini del supermercato (se smetteste di leggere ora non vi biasimerei); insomma, tutto quel cibo a cui uno non dovrebbe nemmeno pensare, ma che a volte è un vero salvavita! E poi potete sempre riproporre le stesse ricette preparandovi il necessario a casa. :) 
Ecco quello che ho usato io:

Mummie spaventose:
Una confezione  e 1/2 di pasta sfoglia
8 wurstel

Zucca vomitosa:
Una zucca di dimensioni medio-piccole
Spinaci (io congelati)

Cornetti mostruosi:
Cornetti al burro
Nutella

Iniziamo dalla star della serata: signore e signori, la zucca vomitosa!


Il mio ragazzio ha svuotato la zucca e io l'ho incisa;  era la prima volta per me e mi sono divertita un sacco! ^_^ Non so come dirlo in un modo che non sia disgustoso, ma per il vom... (ehm, ci siamo capiti) ho usato degli spinaci, ma chiaramente potrete sostituirli con ciò che preferite. Secondo me è un'idea molto carina :)
E' il turno delle mummie spaventose: dovrete semplicemente tagliare la pasta sfoglia in strisce ed avvolgerle intorno ai wurstel. In questo modo potrete realizzare sia il corpo che la testa, e con dei pezzettini minuscoli di  impasto, se volete, potete formare gli occhi delle mummie. In forno a 200° per circa 30' e via! :)


A mio modesto parere non c'è cena senza dolce, quindi ci siamo inventati questi croissant mostruosi. Inizialmente non ero nemmeno sicura se includere questa "ricetta" nel post, tanto è banale, ma poi ho pensato che può comunque essere uno spunto carino, molto veloce. Se avete bambini poi, inventarsi varie espressioni può essere un gioco divertente. Ho tagliato i croissant a metà, ma senza aprirli completamente, li ho riempiti con la Nutella a formare la bocca, e, con uno stuzzicadenti sporco di altra Nutella, ho disegnato gli occhi e i dettagli del viso. Non sono l'apice del cake design, ma questo post ha come messaggio principale: con poco tempo e zero organizzazione è ancora possibile passare una notte di halloween carina e divertente.


Le decorazioni sono l'unica cosa che non abbiamo comprato lo stesso giorno, ma sono davvero essenziali: qualche candela nera per l'atmosfera, delle ragnatele finte, e alcune zucche di quelle piccole, ornamentali.


Ah, quasi dimenticavo! I cappelli da strega! :D


Saturday, September 21, 2013

Cinnamon pull apart bread


First official day of autumn. But, truth be told, summer in Germany has left us since 2-3 weeks. And for the first time in my life I don't mind. I have always been the kind of person that loves, adores summer and really hates winter. When the Sun is out I am all happy and merry and life seems beautiful...and when the good season is over I turn into a grumpy being, just waiting for the storm to pass. You can imagine then how life has been in the past two years of my life here in Germany, where  winters are much longer and colder than the ones I am used to. My poor boyfriend can testify :P But...not this time. I guess I finally managed to adjust to a very basic fact of life: Germany is cold. And cloudy. And it's fine. Either you accept that or you will be miserable for the rest of your days in this country.
Being adaptable is the only way to survive when you move from a country to another as often as I have in the past 3 years - and as probably I will have to do for many more. It is a very simple concept, but not as much as it seems - at least it wasn't for me. But maybe I am slowly drifting towards it, and I am glad.
So last week end, inspired by the cloudy weather, I decided to try this bread, whose recipe i found here e here, that really screams autumn! We had it warm, and the house was smelling of cinnamon, and it was so cozy, comfortable. And I was grateful to be there, at home, safe from the storm outside. Winter is coming and I can't wait. :)

You will need:

3 cups flour
1/4 cup granulated sugar
1 bag dry yeast
1/2 tsp salt
57 gr butter 
1/3 cup whole milk ( 83 ml )
1/4 cup water (62 ml)
2 eggs at room temperature
1 tsp vanilla extract

1 cup granulated sugar
2 tsp ground cinnamon
1/2 tsp ground nutmeg
57 gr brown butter

In a bowl mix 2 cups of flour, sugar and yeast. Warm up milk with butter until butter is just melted add the, pour it in the flour mixture and stir to combine. Lightly beat the eggs and add them little by little to the dough, put salt and 3/4 cup of flour and mix until combined. The dough will be quite sticky at this point, that's how it is supposed to be. Pour the dough in a greased bowl, cover it with plastic wrap or a clean towel and let it rest until it doubles its volume. In the meanwhile prepare the brown butter:in a medium skillet melt the butter over medium heat until it gets brown. At this point your kitchen will be filled with this great smell of toasted hazelnuts...gorgeous! Remove the pan from the stove and pour the butter in another bowl (better if it is in an ice bath) to stop the cooking process. This wasn't mentioned in the original recipe, but I read somewhere that the small particles that form during the preparation of brown butter are not good for our health, so it should be passed trhrough a very fine seive, or a clean cloth. I didn't do it since I didn't know at the time - I will from now on. If someone know more on the matter, please, share :)
In a cup or a small bowl mix together cinnamon, sugar and nutmeg. Of course you can adjust the quantities to your liking. 
When the dough has doubled its volume knead in the remaining two tablespoons of flour, then roll it down into a rectangle. Spread it with brown butter and sprinke the sugar and spices mixture evenly. Cut the dough into regulare rectangles (you can cut them in stripes, stack them on top of each other, and cut them in rectangles) and put them in a buttered and floured loaf pan. Let them rest for about 30 minutes then cook them in the oven at 180° for about 40 minutes.


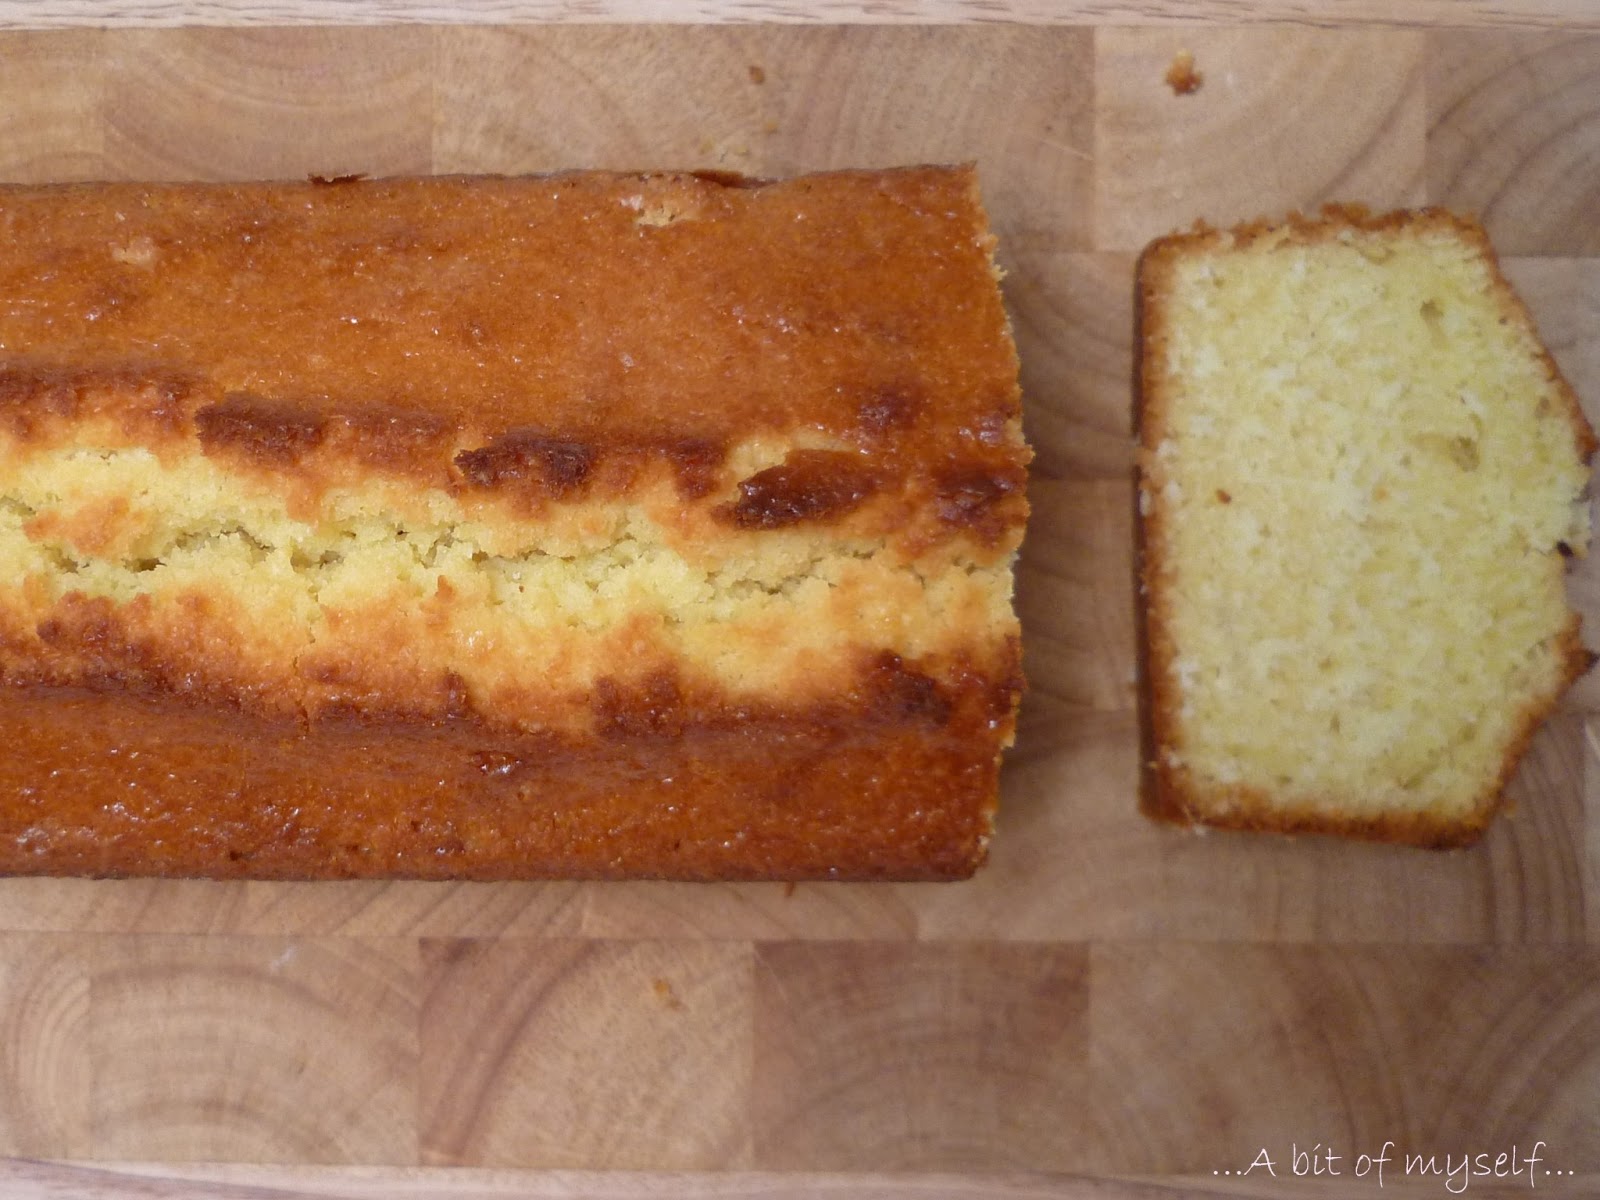
I put the cake at medium height in the oven, but next time i will put it a bit lower down, so that the top come out a bit less brown. It wasn't burnt but it doesn't look as nice as it could. In theory one should wait for about 30 minutes for the cake to cool down and then take it out of the loaf pan...what really happened is that we dived into it, despite the burnt fingers, and we pulled layer by layer, and ate most of it in something like half an hour...so warm and cinnamony and puffy...really really delicious! I loved this recipe and I will try different versions...it is just  perfect for this season!


PANE DOLCE  DA STRAPPARE ALLA CANNELLA


Il primo giorno d'autunno. Ma, a dire il vero, l'estate qui in Germania ci ha lasciato già da 2-3 settimane. E per la prima volta in vita mia, non me ne dispiace. Sono sempre stata il tipo che ama, adora l'estate e detesta l'inverno. Quando il sole splende mi sento felice, allegra, e la vita mi sembra più bella...e quando la bella stagione finisce mi trasformo in un essere brontolone, in attesa della fine della tempesta. Potete immaginare come sia stata la mia vita negli ultimi due anni qui in Germania, dove gli inverni sono molto più lunghi e freddi di quelli a cui sono abituata. Il mio povero ragazzo ne è testimone. :P
Ma stavolta no. Credo di essere finalmente riuscita ad adattarmi ad una piccola, semplice verità: in Germania fa freddo. Ed è nuvoloso. E va bene così. O lo accetti, o sarai infelice per il resto dei giorni che trascorrerai qui.
Essere malleabile è il solo modo per sopravvivere quando ci si sposta da un Paese all'altro con la frequenza con cui l'ho fatto negli ultimi tre anni - e con cui probabilmente lo dovrò fare ancora per molti altri a venire. E' un concetto estremamente semplice, ma non tanto quant sembra - o almeno non lo è stato per me. Ma forse mi ci sto avvicinando pian piano, e ne sono felice. 
Perciò la scorsa settimana, ispirata dal tempo nuvoloso, ho deciso di provare questa ricetta, trovata qui e qui, che veramente grida autunno! L'abbiamo mangiata calda, e la casa profumava di cannella, e l'atmosfera era intima, confortevole. E mi sono sentita grata di essere qui, a casa, al riparo dalla tempesta. L'inverno sta arrivando e io non vedo l'ora. :) 

3 cups farina (360 gr)
1/4 cup zucchero semolato (50 gr)
1 bustina di lievito per pane
1/2 cucchiaino di sale
57 gr burro
83 ml latte
2 uova a temperatura ambiente
1 cucchiaino di estratto di vaniglia

200 gr zucchero semolato
2 cucchiaini di cannella in polvere
1/2 cucchiaino di noce moscata grattugiata
57 gr burro nocciola

 In una ciotola unite 240 gr di farina, lo zucchero (50 gr) e il lievito. Scaldate il latte con il burro finchè questo si sarà sciolto, lasciate stiepidire e versate nel composto di farina, mescolando o sbattendo con le fruste elettriche finchè gli ingredienti non saranno amalgamati. Sbattete leggeremente le uova ed unitele poco a poco al composto, lasciando le fruste in azione e mescolando finchè non saranno completamente incorporate. Unite 90 gr di farina e il sale e impastate nuovamente. L'impasto sarà piuttosto appiccicoso, ma questa è la consistenza giusta. Riponetelo in un contenitore leggeremente unto (io l'ho imburrato) e coprite con la pellicola. Lasciate riposare finchè avrà raddoppiato il suo volume. 
Nel frattempo preparate il burro nocciola: scaldate il burro a fuoco medio finchè' imbrunirà. A questo punto la cucina si riempirà di un gradevolissimo profumo di nocciole tostate...fantastico! Rimuovete il pentolino dal fuoco e versate il burro in una ciotola (meglio se immersa in acqua ghiacciata) , in modo da fermare la cottura. Nella ricetta originale non viene fatta menzione di questa cosa, ma da qualche parte  ho letto che le particelle che si formano durante la preparazione del burro nocciola sono dannose per la salute, e che quindi andrebbe filtrato attraverso un colino a maglia strettissima, o, ancora meglio, un panno pulito. Non sono riuscita ad ottenere informazioni più dettagliate al riguardo, se ne sapete di più mi farebbe piacere se condivideste il vostro sapere. ;)
A questo punto unite i 200 gr di zucchero alla cannella e alla noce moscata. Mettete da parte. 
Quando l'impasto avrà raddoppiato il suo volume versatelo sulla spianatoia infarinata, aggiungete i rimanenti 30 gr di farina e impastate. Stendete in un rettangolo non troppo sottile, che cospargerete con il burro nocciola e la miscela di zucchero e spezie. Tagliate l'impasto in 3 o 4 strisce larghe circa 8 cm, impilatele e ricavate dei rettangoli. Trasferiteli in uno stampo da plumcake imburrato e infarinato e lasciate riposare per altri 30 minuti. Infornate in forno caldo a 180° per 40 minuti.


Ho cotto questo pane a metà forno, ma la prossima volta proverò ad infornarlo un po' più in basso, per evitare che diventi così scuro. Non era assolutamente bruciato, ma anche l'occhio vuole la sua parte, no?! ;) 
In teoria bisognerebbe aspettare una mezz'ora che il pane si raffreddi per poi rimuoverlo dallo stampo...quello che è realmente successo è che ci siamo tuffati in questo dolce, e nonostante le dita ustionate, abbiamo strappato via strato dopo strato...e dopo i 30 minuti di cui sopra di pane ne era rimasto ben poco! Caldo, soffice, speziato...irresistibile! Una ricetta davvero ottima, che proverò in altre varianti...perfetta per la stagione!


Friday, September 6, 2013

Recycled food is good: basmati rice ramekins with zucchini and speck with melted mozzarella center


Hello everybody! Here I am, back from my holidays at the sea side! After waiting for sooo long -it really felt like it was forever - I could finally enjoy the sea, the beach and some good, relaxed quality time! The weather wasn't great but still I am very happy that we managed to arrange this holiday: I feel so much better!
After a few quite intense working days I finally manage to find some time to update my blog, with a quick and easy recipe made basically from random leftover food I had in the fridge. A perfect solution for those hectic after-holidays days, when you know at what time you get in the office, but you never know when you're gonna get out - but you still want to eat some nice food!
This dish was born out of some leftover basmati rice and a zucchini that was near the end of its days, and a new set of ramekins that I absolutely wanted to use! :P
So here is what you're going to need:

1/2 cup of basmati rice, already cooked (about 100 gr)
1 zucchini
1/2 onion
50 gr diced speck
mozzarella
grated parmesan

Quick and easy: fry the diced onion and the speck in a medium skillet, then add the julienned zucchini and let it cook. When almost ready add salt and stir in the rice, so that the flavours can mix. Take your rameskins (I needed 4), pour in some of the rice mixture, so that they are half full, then add a piece of mozzarella, that will become your melted yummy center! Cover with more rice, sprinkle with parmesan (don't  be stingy), and pour just a little bit of olive oil on top of the cheese.
Bake at 200° in pre-heated oven for about 10 minutes, or until you get a brown, crunchy crust.
Eat warm!


I didn't have it at that time, but I think that saffron would give a nice additional touch to the dish.

Aaaaaaand stay tuned! I started a new hobby and can't wait to show you the results! Those who also follow me on my Facebook page already saw a couple of shots...as for the other...well, why don't you follow me!? ;) Just kidding, my awesome fantastic little creation will be presented on these pages soon!
Bye and thank you all for reading me, commenting, keeping me company in this tiny little corner I built for myself, it really gives me a lot! ^_^
Byeee!


RICETTA DI RICICLO: COCOTTINE DI RISO BASMATI CON ZUCCHINE E SPECK DAL CUORE FILANTE


Ciao a tutti! Eccomi tornata da una settimana di vacanze al mare! Dopo un'attesa che mi e' sembrata eterna sono riuscita finalmente a godermi spiagge, bagni e relax! Il tempo non e' stato proprio dalla nostra parte, ma sono comunque strafelice di essermi concessa questa vacanza! Mi ha davvero ricaricata! 
Dopo una serie di giornate lavorative piuttosto intense riesco finalmente ad aggiornare il mio blog...con una ricetta riciclo facile e veloce, ottima per queste giornate frenetiche post-ferie...quando sai a che ora entri in ufficio, ma non sai a che ora uscirai - ma la voglia di coccolarsi con il cibo è ancora lì!
Quest piatto e' nato proprio così,  da avanzi di riso basmati, una zucchina solitaria quasi giunta alla fine dei suoi giorni, e delle cocottine nuove di zecca che volevo assolutamente battezzare! :P
Ma veniamo a noi...vi serivranno:

1/2 tazza di riso basmati (circa 100 gr) - già cotto
1 zucchina
1/2 cipolla
50 gr di speck a cubetti
mozzarella
parmigiano grattugiato

Facile e veloce: in una padella rosolate la cipolla e lo speck in un filo di olio extravergine di oliva, quindi aggiungere la zucchina tagliata a julienne e lasciate cuocere. A cottura quasi ultimata aggiustate di sale e aggiungete il riso, mescolandolo per farlo insaporire. A questo punto prendete le cocottine (io ne ho usate 4 in tutto), riempitele fino a metà, quindi aggiungete un pezzetto di mozzarella, che andrà a formare il cuore filante dei vostri tortini :P Coprite con altro riso, distribuite il parmigiano sulla superficie e versate un filo d'olio. Infornate in forno già caldo a 200° per una decina di minuti, o finchè il formaggio avrà formato una crosticina bella croccante!
Servite caldi! 


All'epoca non ne avevo in casa, ma credo che lo zafferano starebbe molto bene in questa preparazione. MAgari lo provate e mi fate sapere? ;)

E poooi presto prestissimo vi mostrerò i risultati di un nuovo hobby! Chi di voi mi segue sulla mia pagina Facebook ha già visto qualche scatto...gli altri...beh, perchè non mi seguite!?!?! ;) Scherzo, le mie nuove opere saranno presto su queste pagine!
Un saluto a tutti, e grazie  voi che mi leggete, che lasciate un vostro pensiero, che mi tenete compagnia in questo angolino che mi sono costruita, mi fa immensamente piacere! ^_^
A presto!

Sunday, August 18, 2013

Don't tell the shepard...


 ...in Italy we have this saying, that would translate to "Don't tell the shepard how nice cheese is with pears"...well I discovered a new cheese-frut combination! :P
Apparently this is quite popular in Bulgaria, and I must sayI can see why!
Watermelon and feta cheese, or even grapes and feta (a bit less summery)...fresh and tasty, and the textures combine very well together! Maybe some of you could be a bit dubious, but so were my non italian friends when I mentioned that we have ham and melon! :D So don't be suspicious and try, taste, experiment! :D

Ok, this is not a recipe, more like a tip, let's say...but it's still summer (at least that's what they say, considering the 16 degrees and the giant clouds) and I am in holiday mood :P

I might disappear for a while, maybe will share some of my non-edible creations (wow, sounds pro :P)...I wish you all a nice end of August, and read you soon! ;)


AL CONTADINO NON FAR SAPERE....


...com'è buono...il cocomero con la feta! Eh si, ho scoperto da poco questa combinazione frutta-formaggio, e devo dire che mi piace molto! A quanto pare è un piatto piuttosto comune in Bulgaria, anche feta e uva è da provare! I sapori e le consistenze si amalgamo in maniera davvero gradevole, in più è un piatto fresco, adatto ai  mesi caldi! Immagino che alcuni di voi possano essere un po' perplessi, ma non vi dico la faccia che hanno fatto i miei amici non italiani quando gli ho parlato di prosciutto e melone! :D Quindi su, non siate diffidenti, provate, assaggiate, sperimentate!

Ok, questa non è proprio una ricetta, più un suggerimento, ma è estate (o così dicono visti il 16 gradi e i nuvoloni grigi) e io sono in modalità vacanza! :P
Potrei sparire per un po', o pubblicare qualcuna delle mie creazioni (sembra quasi professionale) non commestibili...vi auguro una buona fine di Agosto, e ci si rilegge presto! ;)

Wednesday, July 31, 2013

Muscovado caramel cookies


Finally I made them too! And finally I found the time to sit down for a little bit and write a new post!
I've been quite busy at work lately, and I also felt a bit lazy, but I decided it's time to bring some life to my blog, so here we are. :)
The recipe for these cookies is by Luca Montersino, a very famous Italian confectioner, and they are simply gorgeous! They are prepared using brown sugar and Muscovado sugar, that is a very flavorsome. The only tricky part of the recipe the dry caramel, quite burning prone, but it is totally worth the effort!
Here's what you're gonna need:

90 gr brown sugar
25 gr cream
175 gr butter
25 gr Muscovado sugar
275 gr flour

Start preparing the dry caramel: pour some brown sugar (one or two spoonfuls) in a pot over medium heat and when it liquifies and starts caramelizing add another spoon. Repeat the procedure until the brown sugar is over. Add the cream being careful not to get burnt as hot steam will be produced and the cream might boil violently and splatter. At this point, away from the stove, add in the butter little by little, stirring energetically. If it separates from the caramel it won't be a problem. Let the mixture cool down completely and finally add flour and Muscovado sugar and mix until combine. Roll down the dough into a sheet between two parchment paper foils and let it rest in the fridge for half a day.
Once this time has passed, cut the cookies, roll them into some more Muscovado sugar and
bake them at 180 degrees for 12-13 minutes.

I made these cookies twice so far, once only with cane sugar (and they were delicious even like this), and once with Muscovado sugar. The second ones were a bit sweeter according to me, but a bit more aromatic due to the presence of Muscovado. They reminded me of some cookies the have around Germany around Christmas, so next time I will experiment adding some ginger and almonds, because I think they will fit very nicely.

If you want some tips on how to make caramel, David Lebovitz's website provides very useful information, also regarding some precautions you might want to take not to get burnt (caramel can be pretty nasty in this respect).
What else can I say? Try them!!!


FROLLINI AL CARAMELLO MUSCOVADO


Finalmente ce l'ho fatta! Dopo un periodo piuttosto intenso a lavoro e uno successivo di enorme pigrizia, ho trovato il tempo e la voglia di sedermi davanti al pc e aggiornare il blog! Lo stavo abbandonando un po' poverino...!
La ricetta di questi biscotti è dell'ormai conosciutissimo Luca Montersino, è la prima che provo delle sue, e devo dire che è fantastica! L'ingrediente segreto, per così dire, è una qualità di zucchero di canna chiamato Muscovado, molto molto profumato! L'unico passaggio che richiede un po' di attenzione è la preparazione del caramello a secco, perchè (ahimè ne sono testimone) è abbastanza facile da bruciare, e a quel punto lo si deve buttare...ma in ogni caso ne vale assolutamente la pena!
Ecco quello che vi servirà:

90 gr zucchero di canna
25 gr panna
175 gr burro
25 gr zucchero Muscovado
275 gr farina

Come prima cosa preparate il caramello a secco: in un pentolino scaldate poco zucchero di canna, e, solo quando sarà completamente caramellato, aggiungete un altro cucchiaio di zucchero. Attendetene la caramellizzazione e aggiungete altro zucchero; ripetete il procedimento fino a terminare i 90 grammi previsti dalla ricetta. A questo punto unite la panna bollente, facendo attenzione a non scottarvi perchè il composto bollirà in maniera piuttosto forte.  Allontanatevi dal fuoco e unite il burro poco a poco mischiando vigorosamente per amalgamarlo al caramello (anche se i due composti resteranno un po' separati non preoccupatevi). Lasciate raffreddare quindi unite la farina e lo zucchero Muscovado. Stendete l'impasto aiutandovi con due fogli di carta da forno - meglio se potete già stenderlo all'altezza desiderata - e lasciatelo riposare in frigo per mezza giornata (io di solito lo preparo il giorno prima).
Passato questo tempo, estraete l'impasto dal frigo, se necessario stendetelo ancora, e ritagliate i biscotti della forma che preferite. Cospargeteli con altro zucchero Muscovado e cuoceteli in forno già caldo a 180° per 12-13 minuti.   

Ho preparato questi biscotti due volte finora, una solo con zucchero di canna (ed erano deliziosi già così), una con zucchero di canna e Muscovado, come da ricetta. Nel secondo caso li ho trovati leggermente più dolci, ma anche più aromatici, vista la presenza del Muscovado. Il sapore ricorda un po' quello di alcuni biscotti che trovo qui in Germania, specialmente nel periodo natalizio, perciò la prossima volta sperimenterò aggiungendo dello zenzero e delle mandorle a filetti :D

Se volete alcuni consigli sulla preparazione del caramello, il sito di David Lebovitz fornisce alcune informazioni piuttosto utili, anche riguardo ad alcuni accorgimenti utili a non ustionarsi (il caramello è un po' tremendo in questo senso). Che altro? Provateli!


Sunday, June 30, 2013

Chocolate chips cookies with Nutella and almonds


Hello! Here I am, as promised, to share the recipe of these cookies, that I found here.
I added some minced almonds to the original recipe, cause I had prepared some almond milk and didn't want to toss the leftover nuts; what can I say...even my boyfriend, who is not a chocolate lover (don't know how this is possible) found these cookies really delicious!

235 gr flour
75 gr granulated sugar
50 gr brown sugar
110 gr almonds, minced
113 gr butter, room temperature
1 egg
1/2 tsp salt
1/2 tsp baking powder
1 tsp pure vanilla extract

chocolate chips
Nutella

Mix flour with salt and baking powder.
In a separate bowl beat butter and sugars until pale and fluffy, add the vanilla, then the egg, and mix until combined. Add the dry ingredients, always mixing, and finally the almonds and chocolate chips.
Take a spoon of dough, flatten it on the palm of your hand, distribute some Nutella in the center, and form a ball, so that all the Nutella stays the inside the cookie.
Trasfer the cookies in a parchment-lined baking sheet, spacing them, and bake for at 175° for about 20', until golden.


COOKIES CON GOCCE DI CIOCCOLATA, NUTELLA E MANDORLE


Ciao! Eccomi, come promesso, a condividere la ricetta di questi cookies, trovata qui.
Ho modificato la versione originale aggiungendo delle mandorle tritate, avanzate dalla preparazione del latte di mandorle, e che non mi andava di buttare; che dire...persino il mio ragazzo, che non è un amante del cioccolato (non mi chiedete come sia possibile, non ne ho idea), ha trovato questi cookies davvero deliziosi!

235 gr farina
75 gr zucchero semolato
50 gr brown sugar
110 gr mandorle tritate
113 gr burro morbido
1 uovo
1/2 cucchiaino sale
1/2 cucchiaino lievito per dolci
1 cucchiaino estratto di vaniglia

gocce di cioccolato
Nutella

Mischiate la farina, il sale, e il lievito per dolci.
In un contenitore a parte, lavorate il burro con gli zuccheri fino ad ottenere un composto soffice. A questo punto unire l'estratto di vaniglia, quindi l'uovo, sempre mischiando. Aggiungere poco a poco gli ingredienti secchi, le mandorle e per ultime le gocce di cioccolato.
Preparate i cookies: prendete circa un cucchiaio di impasto, appiattitelo sul palmo della mano, e mettete un po' di Nutella al centro del disco così ottenuto. Chiudete formando una pallina, facendo il modo che la Nutella sia tutta racchiusa nell'impasto.
Trasferite i cookies ben distanziati in una teglia rivestita di carta da forno e cuocete in forno preriscaldato a 175° per 20'-25', finché i cookies diventano dorati.


Thursday, June 27, 2013

Buttermilk coconut pound cake


After I made pancakes for the first time I have been willing to prepare them again, experimenting a bit with different versions...for this purpose I bought some buttermilk, that I had never used before, but instead of pancakes I made this pound cake...and I don't regret it! :D
The recipe comes again from Martha Stewart's website, and in the original version some buttermilk is used to make a glaze with coconut flour and confectioners' sugar...I skipped this step and as an alternative I suggest to have the cake with some unsweetened greek yogurt...they go really nicely together! :)

260 gr flour
210 gr sugar
170 gr butter
3 eggs
250 ml buttermilk
1 1/2 tsp baking powder
1/2 tsp salt
1 tsp pure vanilla extract
95 gr coconut flour

Preheat the oven at 175°. In a bowl whisk flour, baking powder and salt.
In a separate bowl beat butter with sugar until pale and fluffy, add the vanilla and the eggs, one at the time.
Whisk in the flour in 3 batches, alternating to buttermilk, then fold in the coconut flour with a spatula.
Transfer to a baking pan and bake for 60°. If you use a toothpick to check if the cake is ready, it should still be a bit moisty when you turn the oven off.


According to the original recipe the coconut flour should be toasted, but I didn't. Ops! Still, I really liked it! ^_^


PLUMCAKE AL COCCO E BUTTERMILK

Dopo aver fatto i pancakes per la prima volta, mi sono ripromessa di sperimentarne quante più varianti possibile...e a questo scopo ho comprato del buttermilk (o latticello), che non avevo mai usato prima...ma, invece dei pancakes, ho finito per preparare questa torta...e non me ne pento! :D
La ricetta viene dal sito di Martha Stewart, e nella ricetta originale il latticello è utilizzato anche nella preparazione di una glassa, insieme a della farina di cocco e zucchero a velo. Io ho saltato questo passaggio, ed ho invece accompagnato una bella fetta di questo plumcake con dello yogurt greco,una combinazione davvero azzeccata! :)

260 gr farina
210 gr zucchero
170 gr burro
3 uova
250 ml buttermilk
1 1/2 cucchiaino lievito per dolci
1/2 cucchiaino sale
1 cucchiaino di estratto di vaniglia
95 gr farina di cocco

Preriscaldate il forno a 175°. Mischiate insieme farina, lievito e sale. 
In una ciotola separata battete il burro con lo zucchero fino a raggiungere una consistenza morbida, quindi aggiungete prima la vaniglia, poi le uova, una alla volta. Incorporate la farina in tre fasi, alternandola al latticello. Unite la farina di cocco con l'aiuto di una spatola. Versate in uno stampo da plumcake imburrato e infarinato e cuocete per 60'. Se fate la prova stecchino questo dovrà uscire ancora leggermente umido al momento di sfornare.


Secondo la ricetta originale la farina di cocco andrebbe tostata prima di essere usata, ma io non l'ho fatto! Ops! :D La torta era molto buona lo stesso! ^_^

Thursday, June 20, 2013

Cous-cous and vegetables stuffed peppers


Summer seems to be slowly arriving to Germany as well: hot weather, sunny days, and a few thuderstorms here and there to make the air chilly and pleasantly breezy. This is my favourite season, and to celebrate it I decided to prepare these peppers, that I filled with spicy cous cous and vegetables....and with the leftovers I prepared a very nice cous cous salad that I had for lunch the following day! 

Ingredients: 

3 peppers
1 aubergine
1 zucchini
1 red onion
150 gr cous cous

paprika
curry

First of all prepare the vegetable: chop the aubergine in small cubes, julienne the onion, one pepper and the zucchini. Heat up some oil in a large skillet, add the onion and let it cook for 5'. Add in the aubergines, the pepper, and after about 10 minutes, the zucchini. Salt the vegetables and let them cook until ready. 
Prepare the cous cous: bring 300 ml of salted water to boil, add paprika and curry to your taste, then pour over the cous cous. Stir it with a fork to prevent clumps from forming. When the water has been absorbed  mix the vegetables to the cous cous. 
Finally, wash the two remaining peppers and remove the seeds and the white inner filaments. Cut in half or remove the top, add a tiny bit of oil and some salt, and stuff them with cous cous.
Bake at 200° for 30'.


PEPERONI RIPIENI DI COUS COUS E VERDURE


L'estate sembra essere arrivata anche qui in Germania: sole, caldo, e qualche temporale qui e là a portare un po' di sollievo e ad alzare una brezza piacevolmente fresca. 
Questo è il periodo dell'anno che preferisco; per celebrarne l'arrivo ho quindi deciso di preparare dei peperoni ripieni di verdure e cous cous  aromatizzato con un pizzico di paprika e del curry (spezia che apprezzo molto).
Premetto che sono andata ad occhio con le quantità, e in effetti parte del cous cous e delle verdure è avanzata, ed è diventata un'ottima insalata fredda che ho mangiato a pranzo il giorno dopo.

Ingredienti:

3 peperoni
1 melanzana
1 zucchina
1 cipolla rossa
150 gr cous cous

paprika, curry

Per prima cosa preparate le verdure: lavatele quindi tagliate le melanzane a cubetti, i peperoni, la cipolla e le zucchine a julienne. Soffriggete la cipolla in una padella capiente, quindi aggiungete le melanzane, i peperoni, e, dopo una decina di minuti le zucchine. Salate e lasciate cuocere a fuoco medio finché non saranno pronte.
Preparate il cous cous: in un pentolino portate ad ebollizione 300 gr di acqua salata, a cui aggiungerete curry e paprika a piacere, quindi versatela sul cous cous. Lasciate che l'acqua venga assorbita, mescolando con una forchetta di tanto in tanto per eliminare eventuali grumi. Una volta pronto, mischiate il cous cous alle verdure. 
Prendete i rimanenti peperoni: tagliateli a metà o rimuovete la calotta, lavateli ed eliminate i semi e la parte bianca. Versate un filo di olio evo all'interno e un po' di sale, quindi riempite con il cous cous. 
Infornate per circa 30' a 200 gradi. 


Sunday, June 16, 2013

Coconut milk raspberry muffins with a surprise ;)


I don't know if by now you guys realized that I love coconut: dried, fresh, with Nutella, in both sweet and savory dishes...even my bathfoam is with coconut milk!
This is to say that when I found the recipe of these muffin on the beautiful blog Pan di zenzero I couldn't resist...
I made some changes to the original recipe, due to lack of ingredients and gluttony! :P

90 gr flour
40 gr coconut flour
70 gr brown sugar
120 gr coconut milk
40 gr butter, melted
5 gr baking powder
pinch of salt

Raspberry jam
White chocolate


In a bowl mix together all the dry ingredients: flour, coconut flour, sugar, baking powder and salt.
In a separate bowl whisk the eggs with the melted butter and the coconut milk. Add to the dry ingredients and stir them in quickly.
In a muffin tray pour a spoonful of dough, add a teaspoon of jam and a little square of chocolate, then add another spoon of dough (fill only 2/3 of the muffin mold, cause they will expand while cooking).
Bake at 180° for 20 minutes. Sprinkle with coconou flour (I forgot :P ) and eat! :D

Sorry for the bad and only picture, these muffins really disappeared in a matter of seconds (I guess this is enough to tell how nice this combination is)! :D


MUFFINS AL LATTE DI COCCO E MARMELLATA DI LAMPONI CON SORPRESA ;)


Non so se a questo punto abbiate capito che io adoro il cocco: fresco, essiccato, con la Nutella, nei piatti sia  dolci che salati...pure il mio bagnoschiuma è al cocco! 
Potete immaginare l'estasi che ho provato quando ho letto questa ricetta sul (bellissimo) blog Pan di zenzero...non ho potuto resistere!
Ho apportato alcune modifiche alla versione originale, sia per mancanza di ingredienti, che per gola! :P

90 gr farina
40 gr farina di cocco 
70 gr brown sugar
120 gr latte di cocco
40 gr burro fuso
5 gr lievito per dolci
un pizzico di sale

Marmellata di lamponi
Cioccolato bianco

In un recipiente abbastanza capiente mischiate tutti gli ingredienti secchi: la farina, la farina di cocco, lo zucchero, il lievito e il sale.
In una ciotola a parte sbattete le uova con il latte di cocco e il burro fuso. Unite agli ingredienti secchi e mescolate velocemente. In una teglia da muffin versate una cucchiaiata di impasto, quindi un cucchiaino di marmellata di lamponi un quadratino di cioccolato bianco, infine coprite con l'impasto (arrivate a 2/3 dello stampo).
Cuocete in forno caldo a 180° per 20 minuti. Sfornate, cospargete di farina di cocco (io me la sono scordata! :P) e mangiate! :D

Scusate per la foto, una sola e pure bruttina, ma questi muffin sono scomparsi in un batter d'occhio (credo che questo la dica lunga sulla bontà della combinazione lamponi-cocco)! :D